Food never tastes better than when cooked outdoors. And nothing quite highlights a fun campout like your favorite foods prepared using special outdoor cooking methods.
Modern camp cooking can be much like cooking at home. Push a button to light the camp stove or gas grill, or start a charcoal fire, and you're ready to prepare a hot, delicious meal. For many of us, however, camp cooking means campfire cooking. We enjoy preparing foods the old-fashioned way — over the aromatic hardwood coals of an outdoor fire.
To make your next excursion especially memorable, try the following camp cookery methods. All are easy ways to serve up mouth-watering meals for hungry campers.
Dutch Ovens
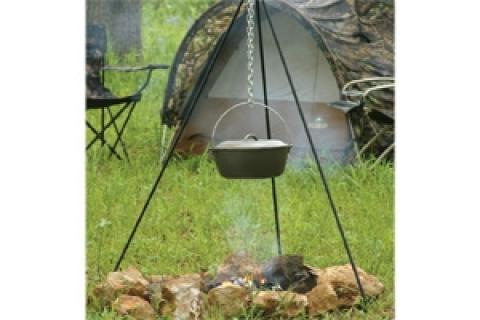
Dutch ovens, once called "bake kettles," originated in the early 18th century. By the mid-1700s, nearly all American families were cooking in Dutch ovens on home hearths and campfires.
 |
|
Dutch ovens are naturals for one-pot meals, but if you want to get spoiled, try the luxury of a whole battery of ovens. |
Today's Dutch ovens differ little from early models. Each is a large deep pot with a tight-fitting lid. Three short legs support the whole affair over coals. The lid has a raised rim to retain coals placed on the lid. With this arrangement-coals on top and coals beneath-the oven can be evenly heated. Old-time ovens were heavy cast iron, but now you can purchase lighter aluminum ones, too.
Seasoning a new cast-iron Dutch oven is important. First, clean the oven in hot sudsy water to remove any factory coating. Then rub salt-free shortening or cooking oil on all surfaces, and heat the oven for an hour or two with low heat. This can be done with your home oven set at 250-300 degrees or with a few campfire coals set on top of and beneath the Dutch oven. Allow the oven to cool, and coat it lightly with cooking oil to prevent rusting.
Preheat your Dutch oven before baking by placing a few coals over and under for several minutes. This helps keep food from sticking. Place the food directly in the oven, or in a pan or aluminum foil wrapper set inside. I like cooking large cuts of meat, soups and stews, and boiled or steamed vegetables, directly in the oven. Foil cups are good containers for muffins. When making a cake or pie, I use a pan in the oven, elevated slightly with two metal tent pins or nails placed underneath.
Coals are placed under the oven, and on top, when cooking. Generally, when making dishes with high liquid content, such as stews and soups, place two-thirds of the coals beneath and one-third on top. When baking, reverse these proportions: one-third beneath and two-thirds on top. When using charcoal briquettes for baking, I usually place six or seven under a 12-inch oven and 12-15 on top, replenishing these with new briquettes as needed.
Regulate the heat if necessary by adding or taking away coals. I build a small fire beside the oven from which to shovel on fresh coals. Check cooking progress by lifting the lid with tongs or a hook.
Remember, too, that Dutch ovens are not just for baking. They work well for pan frying, broiling, and deep-frying as well. The lid can be inverted and used as a griddle.
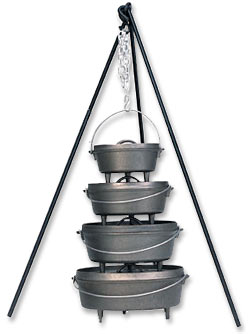
Dutch ovens are naturals for one-pot meals, but if you want to get spoiled, try the luxury of a whole battery of ovens: one for meat, one for vegetables, others for bread, pie, cake, cobbler, you name it. This is real living!
Here are two recipes to try:
Steak Casserole
- 4 pounds steak (venison or beef), cut in one-inch cubes
- 1/2-cup butter
- 2 medium onions, sliced
- 1 pound fresh mushrooms, stems removed
- 1/2-cup flour
- 1 cup dry red wine
- 2 (10.5-ounce) cans condensed onion soup
- 2 soup cans water
- Salt, black pepper
In a Dutch oven, saute venison cubes in butter until brown on all sides. Add onions and mushrooms; saute until vegetables are wilted. Sprinkle with flour. Stir in wine, soup and water. Stir to blend. Cover and place on coals at edge of campfire. Add coals to the oven lid. Cook 1-1/2 to 2 hours for steak. Season to taste with salt and pepper.
Pineapple Upside-Down Cake
- 1 (18-oz.) package yellow cake mix
- Eggs, milk or other ingredients needed to prepare cake mix
- 3 tablespoons melted butter
- 1/2-cup brown sugar
- 1 (16-oz.) can sliced pineapple
Prepare the cake mix in a large bowl per package instructions. Preheat the Dutch oven. Into a 10-inch round cake pan, pour the melted butter then sprinkle on the sugar. Briefly place the pan in the oven to melt the sugar and create the glaze. Remove the pan and place pineapple slices over the glaze. Pour the cake batter over this until the pan is slightly less than full, and set the pan in the oven atop some pebbles or metal tent pins. Bake until a toothpick inserted in the cake comes out clean. Allow to cool 15 minutes then invert onto a plate.
Reflector Ovens
The reflector oven is a wonderful gizmo for camp cookery. It's simple to use, inexpensive and does a professional job of baking biscuits, pies, cakes, cookies, pizza, casseroles and other foods.
 |
| Simply moving the oven can change the temperature. |
Reflector ovens were first widely used in the late 1700s. At that time, they were called "tin kitchens" or "hasteners" and were used for cooking on the home hearth. Modern reflector ovens closely resemble these early cooking aids.
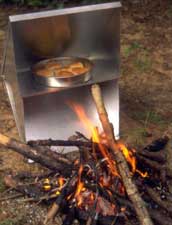
Reflector ovens offer several advantages over Dutch ovens. For one thing, the sheet-metal (usually aluminum) reflector oven is lightweight and collapsible. The one I use is a compact 14" x 14" x 1/2" when folded and weighs a mere 2 pounds. It easily fits in a backpack or under a truck seat and requires less than a minute to assemble or disassemble. Its services compensate for its relatively slight additional weight, and almost anything I bake in a Dutch oven can be ready quicker using the reflector.
Dutch ovens require a bed of hot coals for proper cooking. Reflector ovens, on the other hand, work best with a high, flaming fire. A pile of pine branches feeds the fire quite nicely, and in minutes, you're preparing a baked feast fit for royalty.
The principle by which reflector ovens work is simple. Heat from the open fire is reflected from the shiny interior of the oven. The reflector's slanting top and bottom direct the heat toward the top and bottom of the pan of food being baked, allowing it to brown evenly on upper and lower surfaces. If the cooking temperature seems too hot or too cold, you can move the oven backward or forward to adjust it. If the food cooks unevenly on the sides, rotate the pan.
The best fire for the reflector is a teepee fire built to the height of the oven's cooking shelf. If two reflector ovens are available, place them across the fire from each other so the ovens are facing. This provides maximum reflection of heat.
When cooking with a reflector oven, a certain instinct must replace the clearly defined formulas of conventional baking. Variables like air temperature, wind velocity and fire design can make things difficult for the inexperienced camp cook. But by following a few simple tips, much of the frustration of reflector cooking can be eliminated.
Begin by selecting a flat surface on which to place the oven and build the fire. If necessary, make minor adjustments to compensate for sloping or bumpy ground.
Next, gather an ample supply of firewood. Sticks one to two inches in diameter are best. Larger wood should be split. Softwoods like pine burn hot and fast, ideal for reflector cooking.
Place food on a pan or piece of foil that fits the shelf of the reflector oven, and position the oven near the fire. Knowing just where to place the oven so it heats to the right temperature is the key to good cooking. An oven thermometer on the food shelf helps. But you can also guess the temperature with reasonable accuracy by holding your hand just in front of the oven. If you can hold it there for seven to 10 seconds, the temperature is near 200 degrees; six seconds, 300 degrees; three to four seconds, 400 degrees; one to two seconds, 500 degrees.
After five minutes, check the food to be sure it's cooking properly. If the top is browning faster than the bottom, the fire is too large. If foods are browner on bottom than on top, the fire is too small. Make adjustments as necessary.
Carry two thick potholders or heavy gloves for moving the oven and handling the food. Most reflector ovens also have a back flap that can be opened to check the food.
Now that you know how to cook, all you need are recipes to try.
Here are some of my favorites:
Cheese-Garlic Biscuits
- 2 cups Bisquick baking mix
- 2/3-cup milk
- 1/2-cup shredded cheddar cheese
- 1/2 cup margarine or butter, melted
- 1/4-teaspoon garlic powder
Mix Bisquick, milk and cheese until a soft dough forms. Beat vigorously 30 seconds. Drop dough by spoonfuls onto a sheet of lightly greased aluminum foil cut to fit the shelf of your reflector oven. Bake 8-10 minutes or till golden brown. Mix margarine and garlic powder; brush over tops of warm biscuits.
Easy Cobbler
- 3/4 cup melted butter
- 1-cup sugar
- 1-cup flour
- 2/3-cup milk
- 1 large can sliced fruit
Pour butter in 8-inch square casserole. Combine sugar, flour and milk. Pour over butter. Add fruit. Bake until golden brown.
Little Pizzas
- English muffins
- Pizza sauce
- Grated mozzarella cheese
- Your favorite pizza toppings
Lightly brown muffins in the reflector oven. Spread pizza sauce on each half. Crown with cheese and your favorite toppings. Heat on foil until the cheese is bubbly.
Foil Cookery
Aluminum foil can be used to prepare sealed packets of food to cook on campfire coals or a grill. Heavy-duty aluminum foil is preferred, because it's thicker and less likely to be punctured. Lightweight foil can be used in double or triple thicknesses.
 |
| The classic drugstore wrap is an easy way to get food cooked and cut down on the mess. |
One important facet of foil cookery is sealing the food packets tightly to retain steam and juices, and, at the same time, exclude dirt and ashes. This is accomplished by using a "drugstore" wrap.
Tear off a piece of foil twice as long as you want the completed food package to be. Lay the foil flat, place the food on top, and fold the foil in half so the food is between the folded pieces. Then, beginning where the two end edges meet, make a 1/2-inch fold and firmly press this, sealing the seam. Then fold the seam over two more times, 1/2 inch at a time, and press to seal. The two open ends are then sealed in the same manner, and the packet is ready for cooking.
When cooking meats and fish, seal packages so there's little or no air space between foil and food. Close contact between food, foil, and fire helps brown the food. In cooking vegetables or other foods; however, it may be preferable to "tent" the foil over the food. The extra air space allows the package to act like a pressure cooker, steaming the food until it is done without browning it. One or two tablespoons of water or broth added to each package enhance the flavor and produce a more tender, moist meal.
When cooking directly in campfire coals, add a second foil wrap over the first so the package is less likely to get punctured. When you remove the outer wrap, the inside package will still be clean, and the opened foil can be used as a plate or serving dish.
The manner in which you place the food packets in the fire depends on the heat of the fire and how fast or slow you want the foods to cook. If the coals are very hot, place the foil packs on top of a few coals, turning when half-cooked; or position them beside the coals and tilt the broad side of the packets toward the fire using sticks or rocks to prop them up. If the coals aren't too hot, you may want to bury the packets in coals so there's no need to turn them.
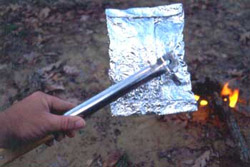
Barbecue tongs or a long stick can be used to turn foil packets so both sides cook evenly, and to remove the packets from the fire when they're done. Foil cools quickly when removed from the coals, but gloves may prevent blisters when opening the packages. To open the food, tear the folded ends or snip the top and pull open. Use care so escaping steam doesn't burn your face or hands.
Foil-cooked foods are a special treat. The following recipes will get you started, but try your own ideas as well. Tasting new dishes you created is the fun of foil cookery.
Baked Apples
- Several apples
- Sugar
- Cinnamon
- Butter
Wash and core apples, preparing one or two per serving. Sprinkle sugar and cinnamon inside the hole, then add a pat of butter. Double wrap apples loosely in foil with a little bit of added water. Cover loosely with coals on top and beneath, and bake for about 20-30 minutes.
Foiled Again Fish Fillets
- 20 saltine crackers, crushed to a fine meal
- 2 tablespoons chopped fresh parsley
- 2 tablespoons chopped fresh dill
- 1/4-cup butter or margarine
- 1 clove garlic, minced
- 1/4-cup lemon or lime juice
- 2 pounds fish fillets
Combine cracker meal, parsley and dill; set aside. Melt butter in a skillet and saute garlic 1 to 2 minutes. Stir in lemon juice. Brush fish with this mixture and place on a sheet of heavy-duty aluminum foil, shiny side inside. Toss remaining lemon-garlic-butter with cracker meal mix. Spoon over fish. Seal foil packet, and cook over coals 8 to 10 minutes, turning once, or until fish flakes easily with a fork.
- 8245 views

